Blog Archives
2017 – Tesserae
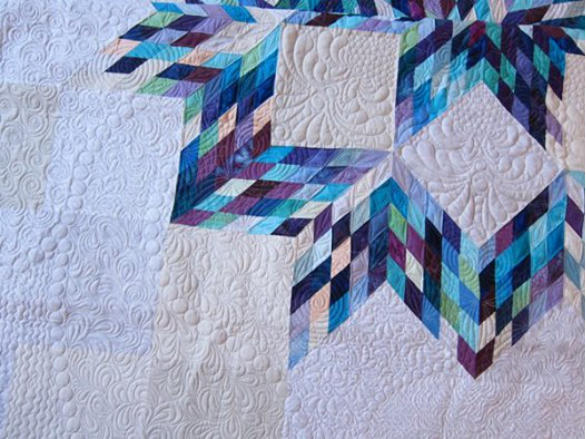
It’s finished. It has taken much time to complete the applique, assemble the quilt sandwich, do the quilting, bind the quilt, and add the embellishments. I began hand quilting it, but realized that the stiffness of the tiles made it difficult to hand stitch, so I switched to machine quilting.

Quilting Between the Tiles
I only quilted on the background (“grouting”) and just enough to keep the layers together. On this quilt, there was no room for quilting as a design element. My Viking’s “in the ditch” foot was perfect for keeping within the lines.
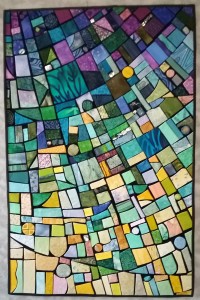
Completed Tesserae
Embellishments were stone, shell, and metal beads used in places instead of appliqued tiles. The final size of the quilt is 22-1/2″ x 34-1/2″.
Another huge thank you to Kathy Thaden for permission to base this quilt on her 9″ x 17″ mosaic “Eden” (c) 2012. Her work can be seen at http://thadenmosaics.com.
Update 3 – 2017 Tesserae

Tesserae Progress Through 1/4/2017
Here is the latest progress adding tiles to the Tesserae quilt. Design based on “Eden” (c) Kathy Thaden: http://thadenmosaics.com
Update 2 – 2016 Tesserae
I am making slow but steady progress on the applique for the mosaic-inspired quilt, “Tesserae.”

Tesserae Progress thru 12/6/16
I am really honing my applique stitch with this project! I can see a big difference between the first tiles and ones attached today.

Tesserae Detail 1
The tiles on the left in this photo were some of the first to be attached; those on the right a few days ago. I’m hoping the difference in technique won’t show when the quilt is complete.

Tesserae Detail 2
Here are tiles attached in the last week. I invested in some John James Size 10 applique needles – they just glide through the fabric. However, their tiny gold eyes made me go find my needle threader. I also started using Roxanne’s Glue Baste-It to keep new tiles in place while I applique. Well worth the price for both needles and glue.
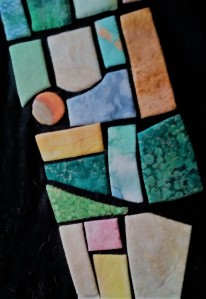
Tesserae Detail 3
Another detail shot. You may have noticed a few empty spots in the layout. Those are reserved for flat stone and silver embellishments – a few real tiles. They won’t be added until the quilting is complete. Design based on “Eden” (c) Kathy Thaden: http://thadenmosaics.com

Update – 2016 Tesserae
The working title for my mosaic quilt is Tesserae – the term for small pieces of marble, glass, tiles, pebbles, etc., used in mosaic work. Design based on “Eden” (c) Kathy Thaden: http://thadenmosaics.com
Here are some views of progress so far:

Fabrics Pulled for Tesserae

Tesserae Applique Begins

Tesserae Plan on Design Wall

2016 New Applique Project
Inspired by the silk applique class I took in September from Chris Wickert, I’m moving on to an original, all-applique project. Here are the steps I’ve taken so far: [If you’re seeing this on Facebook, please click on the photo to see all steps.)

Beginning Sketch

Pattern at Full Size

Tentative Color Placement
With a fistful of felt pens, I auditioned colors. The fabrics will have much greater variation, but this is a general sense of a progression from muted purples through nearly orange at the bottom.
Background Marked for Applique Placement
More to come.
2016 – Fly Away Home
Finished at last. The “geese” are dimensional, made using the one-seam method popularized by Ricky Tims.

Fly Away Home
It’s baby quilt sized.
On to the next project!
Update 2-2016 Fly Away Home
Progress on the Fly Away Home quilt continues slowly. It’s like assembling a jigsaw puzzle while painting the picture at the same time. Here’s one quadrant taking shape on the dining table.

Pieces of Fly Away Home
Update – 2016 Fly Away Home
Progress on the Fly Away Home quilt has been slow recently, but I finally pieced some of the flying geese blocks. I’m using the dimensional technique with one seam down the center, with the “goose” folded out.

Flying Geese Blocks for Fly Away Home Quilt
Plans for a New Quilt
I have been working on an idea for a modern quilt using three-dimensional flying geese. This was my first idea:
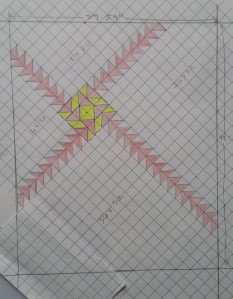
Beginning plan for Fly Away Home
Definitely modern with its alternative grid and negative space. The geese finish to 2″ x 4″ and are flying toward the “nest” which is, of course, not in the center of the quilt.
After sketching this, I decided to enlarge the geese to 2-1/2″ x 5″, so the outside dimensions on these sketches no longer apply. I made a few blocks to try on my design wall, but the negative space just seemed too much, so . . .

Second variation for Fly Away Home
The exact placement of the extra geese will probably change, and I think I will also scatter some white-on-white geese around for additional texture. I’m also going to try shading the white to turquoise toward the edges of the quilt.
More to come.
Save the Date – Genesee Valley Quilt Fest – June 5-7, 2015

With over 600 quilts on display, a wonderful Vendor Mall, workshops, lectures, demos, special exhibits, and lots more, The Universe of Quilts quilt show will be held by the Genesee Valley Quilt Club Friday through Sunday, June 5-7, 2015. The site is Gordon Fieldhouse on the campus of RIT, 1 Lomb Memorial Drive, Rochester, New York.

2015 GVQC Raffle Quilt
This gorgeous quilt, made by GVQC members, will be raffled that Sunday to support the show’s designated charity, Lap Robes for Veterans. For more details, visit http://www.geneseevalleyquiltfest.com

Raffle Quilt Detail
Raffle Quilt Detail


You must be logged in to post a comment.