Blog Archives
2018 – Green Fuse – Finished
Green Fuse – a full-sized bed quilt – was part of the Rochester Modern Quilt Guild’s “Taking Flight” show (September 29, 2018).

I used a bright lime thread for all the quilting.

2018 Green Fuse Floral Quilting Details

2018 Green Fuse Floral Details
I quilted florals on the white area, seedlike ovals on the green, and roots on the gray.

2018 Green Fuse Quilting Detail “Rose”
Also among the roots was part of the Dylan Thomas poem “The force that through the green fuse drives the flower.”
More quilting details in next post.
Update 5 – 2017 Tesserae
I’ve paused adding new tile pieces to Tesserae to make some corrections to earlier work. About a dozen tiles that seemed crooked, misplaced, or wrongly colored were pulled and changed.

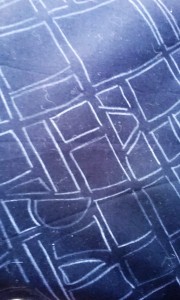
Adjustments to Tesserae Tiles
This photo shows where several tiles were pulled to be adjusted. From the back, you can see the Peltex interfacing forming the stiff body of each tile. I used the numbered pattern pieces to assure that the tiles went back where they belonged. And yes, there are that many tiles – in fact nearly 350 – in the quilt.
Based on the mosaic “Eden” (c) 2012 Kathy Thaden.
Update 3 – 2017 Tesserae

Tesserae Progress Through 1/4/2017
Here is the latest progress adding tiles to the Tesserae quilt. Design based on “Eden” (c) Kathy Thaden: http://thadenmosaics.com
Update 2 – 2016 Tesserae
I am making slow but steady progress on the applique for the mosaic-inspired quilt, “Tesserae.”

Tesserae Progress thru 12/6/16
I am really honing my applique stitch with this project! I can see a big difference between the first tiles and ones attached today.

Tesserae Detail 1
The tiles on the left in this photo were some of the first to be attached; those on the right a few days ago. I’m hoping the difference in technique won’t show when the quilt is complete.

Tesserae Detail 2
Here are tiles attached in the last week. I invested in some John James Size 10 applique needles – they just glide through the fabric. However, their tiny gold eyes made me go find my needle threader. I also started using Roxanne’s Glue Baste-It to keep new tiles in place while I applique. Well worth the price for both needles and glue.
Tesserae Detail 3
Another detail shot. You may have noticed a few empty spots in the layout. Those are reserved for flat stone and silver embellishments – a few real tiles. They won’t be added until the quilting is complete. Design based on “Eden” (c) Kathy Thaden: http://thadenmosaics.com

Update – 2016 Tesserae
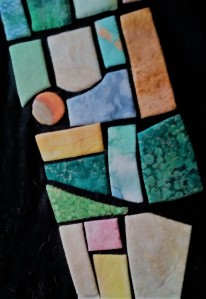
The working title for my mosaic quilt is Tesserae – the term for small pieces of marble, glass, tiles, pebbles, etc., used in mosaic work. Design based on “Eden” (c) Kathy Thaden: http://thadenmosaics.com
Here are some views of progress so far:

Fabrics Pulled for Tesserae

Tesserae Applique Begins

Tesserae Plan on Design Wall

2016 New Applique Project
Inspired by the silk applique class I took in September from Chris Wickert, I’m moving on to an original, all-applique project. Here are the steps I’ve taken so far: [If you’re seeing this on Facebook, please click on the photo to see all steps.)

Beginning Sketch

Pattern at Full Size

Tentative Color Placement
With a fistful of felt pens, I auditioned colors. The fabrics will have much greater variation, but this is a general sense of a progression from muted purples through nearly orange at the bottom.
Background Marked for Applique Placement
More to come.
2016 – Fly Away Home
Finished at last. The “geese” are dimensional, made using the one-seam method popularized by Ricky Tims.

Fly Away Home
It’s baby quilt sized.
On to the next project!
Update 2-2016 Fly Away Home
Progress on the Fly Away Home quilt continues slowly. It’s like assembling a jigsaw puzzle while painting the picture at the same time. Here’s one quadrant taking shape on the dining table.

Pieces of Fly Away Home
Update – 2016 Fly Away Home
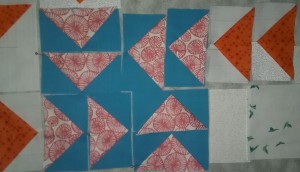
Progress on the Fly Away Home quilt has been slow recently, but I finally pieced some of the flying geese blocks. I’m using the dimensional technique with one seam down the center, with the “goose” folded out.

Flying Geese Blocks for Fly Away Home Quilt
2016 Fly Away Home
More on the new quilt, right now being called Fly Away Home.
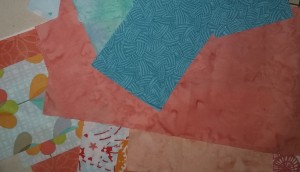
Colors and fabric ideas for Fly Away
Here are some fabrics being auditioned for this quilt. I’m thinking the geese will fade from bright orange at the center through coral to very pale. The white/neutral background will hopefully deepen into aqua, then turquoise, toward the quilt’s edge. We’ll see how fabric selection proceeds. I tried a progression like this before (see Dwindle at https://lotuscove.wordpress.com/?s=dwindle from 2014) with only limited success.
First 3-D Flying Geese
The exception to the turquoise fade is the central “nest” block, here pinned to my design wall. The 3-d geese are easy to make, but the openings need to be pinned until the blocks are joined. Here’s a link to good instructions for constructing them:
http://www.generations-quilt-patterns.com/3d-flying-geese-quilt-block.html


You must be logged in to post a comment.